#DIY: How to Easily Build an Industrial Farmhouse Console Table.

Console tables made of solid wood and steel can cost $500-$800!Expensive Industrial Farmhouse Console Table

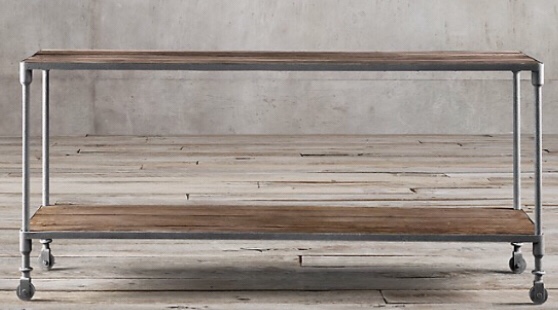
I built a similar solid wood and steel console table in one afternoon for around $150.

Industrial Console Table DIY

HOW TO BUILD THIS INDUSTRIAL FARMHOUSE CONSOLE TABLE:

1. Go to your local hardware store (I bought my supplies at Home Depot) and buy:File Jan 21, 7 48 44 AMIndustrial Console Table List of Supplies

2. Remove any stickers and wipe away any debris, then LOOSELY connect the nipples and flanges to make four 24″ legs and four 3″ legs. (You will still be able to see some of the threading, they will not screw together completely.)

3. Spray paint the legs with the Rust-oleum hammered paint and primer.

4. While the legs are drying for 30-60 minutes, distress the boards. (My 11-year old son and his friend sanded the ends of the boards to smooth the edges and took a hammer and screwdriver to the boards. (Scratch against the grains of the boards to distress them. This will show up more deeply when you stain it.)

5. Use a damp washcloth to wipe away any sawdust from the sanding or debris from the distressing process.

6. Stain the boards. WEAR RUBBER GLOVES TO PROTECT YOUR SKIN. Use a washcloth and dip it into the Minwax stain. Rub your wash cloth along the boards to stain the boards. You won’t need to use very much stain. I only did one coat, but you could add another coat if you want the stain to appear darker.

7. Wait for the stain to dry about 30-60 minutes. (Optional: apply Minwax paste finishing wax to give it a matte glossy finish and protect your wood).

8. Measure the boards from the end to position the legs an equal-distance on each side of the boards. I measured 12″ in on each side, drawing a vertical line across the width of the board marking 12″ from the end of the board.

9. Screw the flanges onto the boards. I aligned the edge of the flanges inside my 12″ mark.

10. Drill pilot holes for each of the flanges. I unscrewed the nipples and flanges and held the flanges in place while I drilled the pilot holes.

11. Screw the 12 flanges to the top and bottom of one board and to the bottom of the other board.

12. Screw the 3″ nipples with flanges to the bottom of the board. It will be wobbly until you balance out the height by tightening or loosening the connections. (I found that it was easiest to screw the nipple into the flange completely on the bottom and loosen it while tightening the connection to the flanges above it.

13. Once the footings are balanced and attached to the bottom board, completely screw in the nipples to the flanges on the top of the same board.

14. Get someone to help you align the flanges attached to the top board with the nipples screwed into the bottom board. Once they are aligned, you will loosen the fittings on the bottom slightly as you tighten the fittings on the top. Test the connection periodically until the fittings are secured and aligned. This can take some time as you are balancing the height to make it level.

You are finished! Congratulations!!

DIY Industrial Farmhouse Console TableDIY Industrial Farmhouse Table EASY

The Step By Step Guide to Make a Weighted Blanket for $25.

The supplies to make this weighted blanket cost about $25. It took me three hours to complete. If you are a savvy seamstress (unlike myself) you might be able to finish even faster!

This size and weight is for a 40-pound child.

The formula to choose the weight is: 10% of the child’s weight plus one pound.

1. Purchase 3-yards of fabric. I used flannel fabric because it is easiest to work with (and it was on sale).

2. Wash and dry fabric, then iron out any wrinkles so the fabric lays flat.

3. Fold the fabric in half so the “pretty” sides are face to face.

4. Use a washable marker to measure out a rectangle size 48″x40″.

5. Trim off any excess fabric leaving a one inch border around the lines.

6. Pin the blanket together and sew along THREE SIDES ONLY of the blanket leaving one end open. (You will see two orange marks on my blanket–I made a mistake you don’t need to do this).

7. Trim away any excess fabric so there is about a quarter inch left over (again, ignore the second orange line on the left –that was my mistake).

8. Turn the blanket inside-out to reveal the bright colors on the outside. It should look like a giant pillowcase.

9. Use the tips of your scissors to push the corners out.

10. Make a secure trim around the edge of the blanket, by sewing along the perimeter 2-inches from the edge on three sides to create a trim.

11. Now it is time to draw the lines for the vertical stitches for the weighted blanket. Make a mark using a washable marker along the horizontal and vertical edges of all sides of the blanket every 4-inches. Use a yardstick to connect the dots and make a grid that you will use as guidelines for sewing the 4″x4″ squares of the blanket.

12. Once you have your 4″ x 4″ squares grid completed, you are ready to sew the vertical lines.

13. Sew along all the vertical guidelines until you have 9 vertical columns with openings at the top.

14. It’s time to fill the columns and sew the rows, one at a time. I purchased plastic pellets in bulk from BGBoards LLC (bgboardsllc.etsy.com) for $25.99 plus shipping for a 16-pound bag.

15. Fill each of the nine columns with one shot glass full of plastic pellets. (If I had a scale, I would have weighed one ounce of beads for each column).

16. Shake all the beads to the bottom of the blanket.

17. Sew a stitch along the bottom row to seal the beads into squares. Continue doing this for all ten rows.

* be careful that you don’t get one of the plastic pellets stuck underneath your sewing machine needle. It will break it!

18. After you have sewn all the rows, it is time to finish the end.

19. Use pins to tuck the ends together.

Remove the pins and add one extra row of stitching…you don’t want any little pellets falling out!

20. Wash your blanket in the washing machine on the gentle cycle to rinse away any ink marks. Air dry. Enjoy!

DISCLAIMER: NEVER LEAVE A CHILD ALONE WITH A WEIGHTED BLANKET!

And…if you dont want to make one, you can always buy one!

The Window to your True Self

I am writing a children’s book!
I was inspired to write the story a year ago while reflecting on a fun “game” I played with my kids when they were younger to get them to take a nap. The game worked like a charm, so I decided to share it with the world.
For the past year, I have edited and rewritten the story about 110 times.
This very moment, my old pal from Frontier Trail Junior High School, Lewie Smith, is bringing the story to life with his AMAZING illustrations (check out some of his work: Lewie Smith)
We look forward to seeing Snooze on bookshelves in March 2015…just in time for daylight savings time–when our clocks spring forward and sleepy tots (and their families) REALLY need a nap to make up for that “lost” hour of sleep.
Lewie recently asked me to send him a list of all of my favorite childhood toys to include in the illustrations for our book.
I am having a BLAST reflecting on the toys from my childhood. Do you remember playing Candy Land, Care Bears and Tinker Toys? Sit-n-Spins? Easy Bake Ovens? Rainbow Brite?
Oh my goodness…such fun memories!
I never did have one of those Easy Bake Ovens, man I wanted one…bad. Maybe I will add it to my wish list this year.
All this thinking about toys lead me to ponder this question: How did I occupy my time as a child when I had no other obligations except to play?

I wrote a neighborhood newspaper. Here it is: Kids Update
IMG_0833.JPG
I dug this gem right out of my Snoopy Scrapbook today!
I remember running off copies on my dad’s office fax machine and passing them out to all of the houses on my block.
I am chuckling thinking about me, 20-some years later writing a blog…my grown-up version of Kids Update.

Reflecting on cheerful childhood memories is good for the soul.

It is like peeking through a magical window into your spirit…your true self. Remembering how you played as a child takes you back to a time when your actions were guided by your spirit more than your mind or the societal paradigms.
Your childhood self is your true self. Go ahead, look through that window. Who do you see?
What games did you play?
How did you spend your time?
What made you laugh so hard your belly ached?
Are there similarities to what you played as a child and how you find joy today?
I would love to hear about your reflections!